





Okay so, my nani’s hands.
That’s it. That’s where this starts for me. Not a parlour. Not Instagram.
My nani, on that old charpai in the courtyard, the one with the loose strap in the middle that everybody knew about and nobody fixed, steel bowl next to her, paste gone a bit dry at the edges because she’d been sitting there ages, and she draws this circle on her own palm. Freehand. No coin under it, no stencil, nothing. Just… swoop. Done.
Perfect, obviously. Annoyingly perfect.
I was maybe eleven? Twelve? I tried copying her that same evening on the back page of my maths copy, because of course I did, where else, and mine came out shaped like a papad. A sad, wobbly papad.
She looked at it, didn’t even laugh properly, just said, “pehle chaar nukte lagao”, four dots first, then join them. I remember being almost offended. Four dots? That was the big secret??
It was the big secret. Still is. We’ll get to it further down, don’t worry.
Because here’s the thing nobody writes in these posts: mehndi trends are exhausting. One season it’s Arabic trails everywhere, next season some new thing, then suddenly full arms again. My cousins send me screenshots all week before a shaadi, this one, no that one, no wait this one.
And then Chaand Raat actually arrives, everybody is tired, the cone is leaking, bijli has gone twice, and what does almost every single woman in my house end up with?
A tikki. Obviously a tikki.
One round gol circle, middle of the palm. Everything else is just… stuff around it. Rings if you have patience. Dots if you don’t. When girls search for mehndi designs tikki style, this is what they’re actually asking for, not the complicated bridal spreads, just that one honest circle our grandmothers trusted before anyone had a phone camera.
So no, I’m not going to pretend I invented these. This post is basically my family’s hands, written down. The styles I do on my cousins. The ones I’ve ruined at 1 a.m. and fixed with a toothpick. Front hand, back hand, bridal, feet, and the emergency five-minute version for when the mehndi wali hasn’t turned up and guests are literally parking outside.
If you want the big general gallery first, go look at our simple mehndi designs for girls post and then come back. I’ll wait.
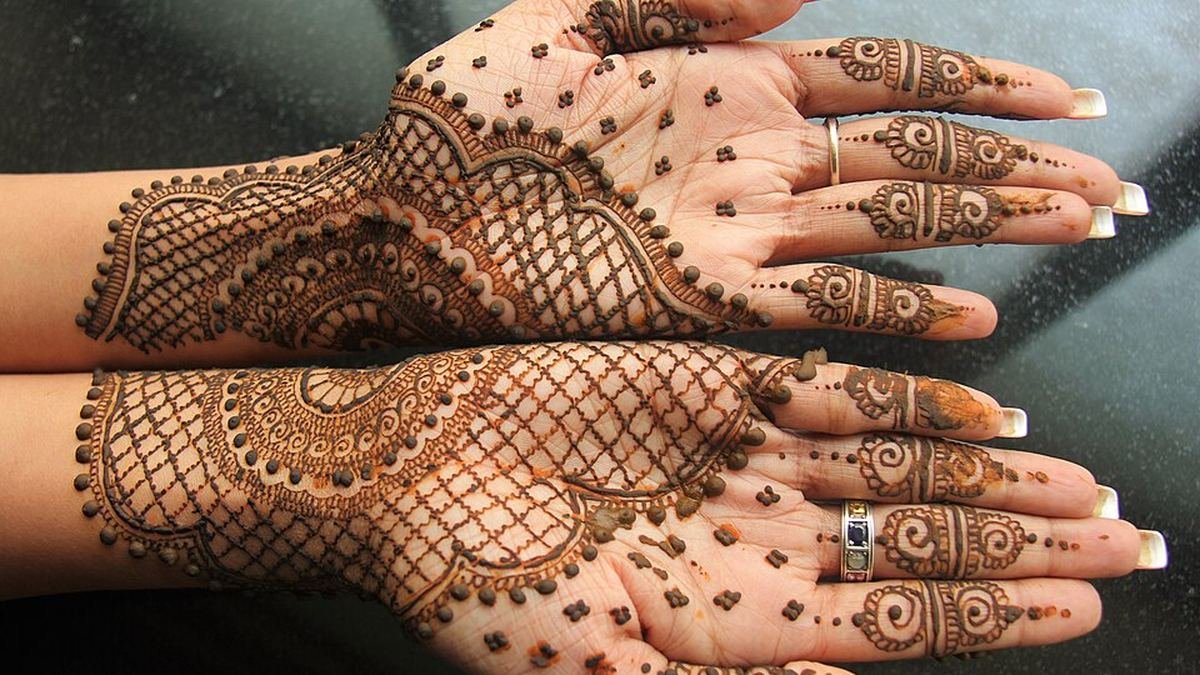
This. This is the one from my childhood, more or less, fat round centre, rings sitting neatly round it, fingertips capped plain. If you’re stuck, copy this and stop overthinking. I have never, not once, seen it look wrong on anyone. Old, young, bride, schoolgirl. Never.
Simple Gol Tikki Mehndi Designs for the Front Hand
Palm first. Always palm first.
Why? The skin there stains the darkest. I don’t know the science-y reason and honestly I don’t care, I just know that on day three, when your back-hand design has gone that tired orange-brown, the palm tikki is still sitting there dark and smug. So if you’re only doing one hand properly (we’ve all had that evening), do the palm.
The Basic Circle Takes Ten Minutes
And the basic one is so simple it feels like cheating. Circle in the middle. Ring of dots round it, or little petals if your hand isn’t shaking. Another thin circle outside if you’re feeling showing-off-ish. Ten minutes. Genuinely ten.
Last Chaand Raat my best friend did her first one herself. She cannot draw. I cannot stress this enough, this girl’s handwriting looks like a doctor’s prescription. Her ring came out wobbly, one side fatter than the other, and you know what? Everyone complimented her. Her mother took photos. That’s how forgiving a tikki is. It carries you.
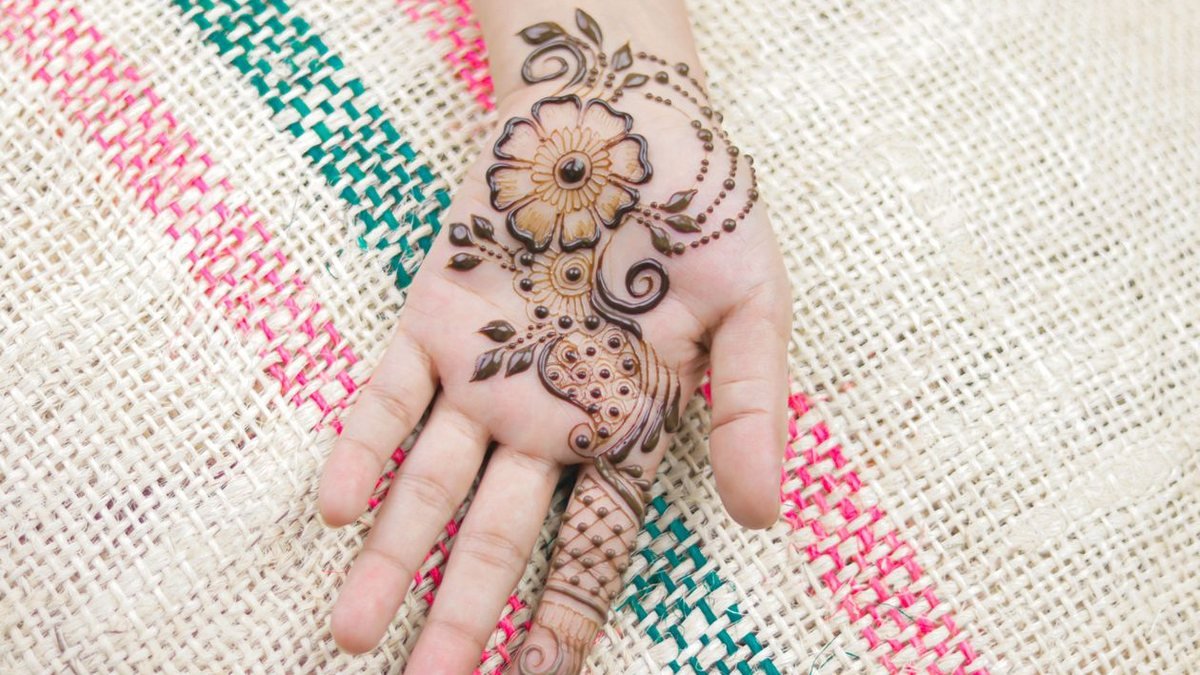
Leave the Empty Skin Alone
Right, unpopular opinion coming, my khala disagrees with me every Eid about this: a small tikki with lots of empty palm around it looks ten times smarter than a palm stuffed edge to edge like a truck art panel. The empty skin is not “unfinished”. It’s the whole look. A plain circle + properly dark fingertips will beat a crowded messy hand every single time, and I will argue this at the dinner table, again, this year also.
Fuller one, this. The work travels down towards the wrist, so it reads “family function, I’ve made an effort” without crossing into bride territory. That line matters. Aunties can spot an over-dressed non-bride from across the hall, I swear.
Notice how everything hugs the circle instead of wandering off all over the palm? Copy that habit. Work that stays close to the tikki makes a hand look full while taking half the time. It’s a trick. A good one.
Want a bit more without going full bridal? Double tikki. One big circle, palm centre. One smaller one down near the wrist. A dotted line joining them so they don’t look like strangers. I did this exact thing at my cousin’s mehndi last winter, yellow kurta, green dupatta that kept slipping off my shoulder the whole night, and in the photos it looks like an hour’s work.
It was twenty minutes. Twenty-two, maybe. The photographer had no idea.
More festive ones like this live in our mehndi designs for Eid collection, by the way.
Layered circles are my lazy-girl shortcut and I’m not ashamed. Just give each ring a different job, dots here, petals there, tiny leaves on the third, because the variety fools the eye into seeing “detailed”. Under twenty minutes, still.
Thin, soft strokes. Lovely with pastels and flowy outfits. Please don’t pair delicate lines like this with a heavy dark outfit though, the outfit wins, the mehndi disappears, and you’ll be annoyed in every photo. Speaking from experience.
10 Front-Hand Tikki Styles Worth Trying
I’m not writing these in any grand order. Some I love, some I just respect.
Single dot tikki, circle, one fat dot in the middle, finished. Nothing else. Sounds like a joke but it photographs better than designs that took an hour, and no, I don’t understand it either.
Petal ring tikki, eight, ten petals round the centre. The nani-approved one. Safe for literally any function where elders are present.
Double circle tikki, two plain rings, dotted gap between them. My pick when I want “modern” but my ammi is watching.
Sunflower tikki, long petals reaching out like rays. Daytime only, in my opinion, mehndis in the sun, that sort of thing.
Jaali centre tikki, instead of a dot, fill the middle with a tiny criss-cross net. Girls always say “oh I can’t do jaali”. You can. It’s just lines crossing. Lines. Crossing.
Half-filled tikki, pattern on one half, other half completely empty. Slightly odd? Yes. Stylish? Also yes. Very now.
Tikki with stained fingertips, small centre, all five fingertips coloured solid. My everyday favourite, the one I do when nobody’s wedding is involved and I just want my hands to look nice holding chai.
Wrist-linked tikki, palm circle joined to a little wrist circle with dots. Same idea as the double tikki above, just saying it again because people forget the wrist exists.
Floral bunch tikki, three small flowers huddled inside one big circle. Looks especially sweet on young girls, my niece asks for “the flower one” by name.
Border-only tikki, just the outline rings. No filling at all. My sister calls this lazy. I call it jewellery. Bonus: it dries fast, and on a busy night that is not a small thing.
Tikki Designs with Finger Trails and Bail
A tikki on its own can look… lonely. There, I said it. One circle, sitting in a big empty palm, waiting for company.
Enter the bail, that slim vine trail that climbs out of the tikki and up one finger. It’s nothing, really. Small leaves. Tiny flowers. Sometimes just dots getting smaller and smaller as they climb, which is my favourite because dots can’t really go wrong. But put that trail on and suddenly the hand looks finished. Dressed. Like you meant it.
Dots Forgive Everything
The version I keep returning to, and I mean for years now, I’m boring about it, is a thin dotted trail on all five fingers, each one ending in a small flower near the nail. Reading that, you’d think “that’s a lot”. It isn’t. It’s dots, girls. Mostly dots. Dots forgive shaky hands, bad cones, low light, everything.
See all the bare skin between the trails? Leave it. Please. I know the urge to fill is strong but crowded trails merge into one brown blur once the stain deepens, and then all your careful work is just… soup. Spacing is the skill.
Which Finger Should Get the Trail?
Which finger should get the bail, though? I get asked this at every function, usually while my hands are full of cones. Short answer: no wrong finger. Longer answer: the middle finger looks most balanced, because the trail continues the straight line running up from the palm. Index finger is bolder, it shows in every photo where you’re holding a cup, a phone, a plate of jalebi. Ring finger is where the romantics play; brides-to-be hide a tiny heart there, or his initial, and then act surprised when people find it. Sure, bhabhi. Artist’s idea. Of course.
One trail per hand if you want minimal, though. Five trails plus a big tikki plus full fingertips starts shouting, and mehndi shouldn’t shout.
For little girls, shrink the whole idea. One small tikki, one short trail, out the door in five minutes, before the fidgeting starts, which with my niece is a window of about ninety seconds on a good day. Gentler patterns for small hands are in our mehndi designs for kids post; I’ve tested them on the said niece. She sat through two entire designs last Eid. We celebrated like she’d passed an exam.
Leafy trails soften everything. And here’s a match nobody thinks of: if your outfit already has leaf or vine print on it, this trail quietly matches the dress. People notice without knowing what they noticed. My favourite kind of compliment, that.
Back Hand Tikki Mehndi Designs
Now flip the hand over. Different game.
On the back, the tikki sits a touch smaller, more open, a mandala with room to breathe. And think about it: the back is your public hand. It’s what people see when you fix your dupatta, hold your chai, wave at someone across the lawn, type, gesture, exist in the world. The palm is a secret you open for people. The back is the announcement.
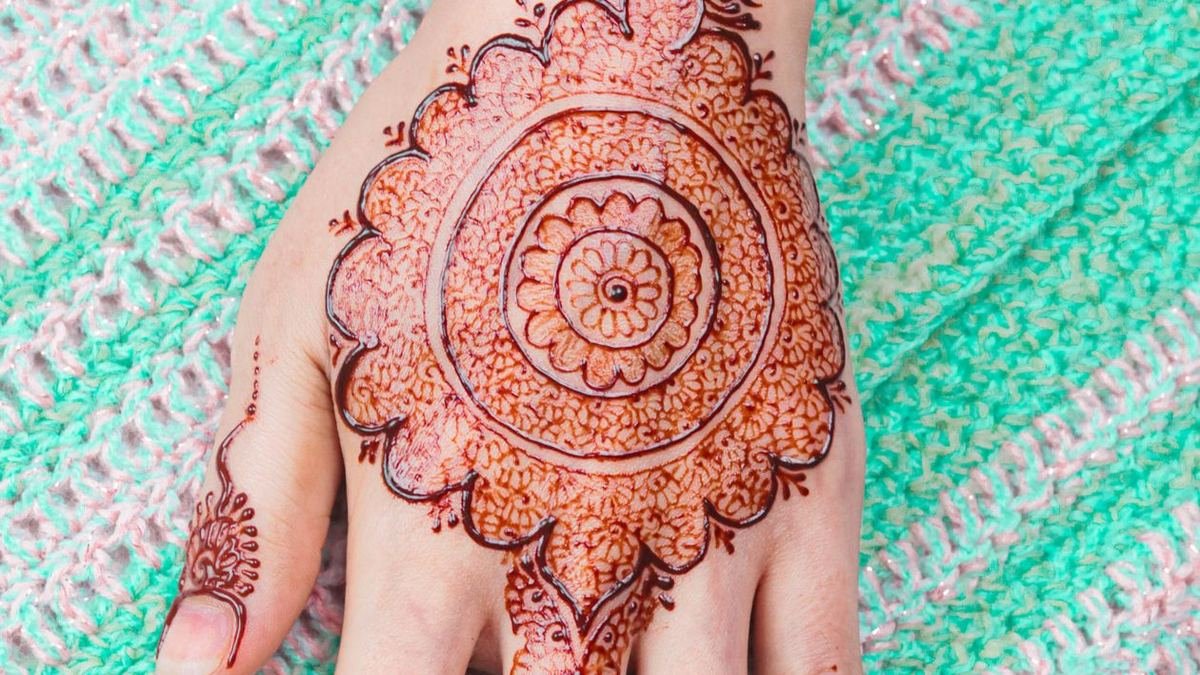
The Half Mandala Everyone Is Wearing
The style that’s everywhere this year, everywhere, I’ve counted it on nine girls at one dholki, is the half-mandala tikki. Only the lower half of the circle gets petals; the top half dissolves into tiny dots heading for the fingers. Delicate in a way the full circle sometimes just isn’t. My other long-time favourite is the tikki joined to a bracelet band at the wrist. Drawn-on jewellery. The bazaar got zero rupees from me for that look and I’m still pleased about it.
Open-centre mandala. Quick warning-slash-comfort: open centres stain a shade lighter than filled ones. Here that’s actually the pretty part, the dark outline against the lighter middle looks planned. It was planned. By you. Just now.
The weekday tikki. Fine lines, big spaces, office-safe, university-safe, won’t announce itself in a morning meeting. Also fades gracefully around day six, which is more than I can say for most bold designs, or for me before coffee.
If the back of the hand is your favourite canvas, our full roundup of back hand mehndi designs puts the tikki styles next to the Arabic and minimal ones, so you can compare properly.
Don’t study the design here, study the endings. Every line stops cleanly instead of trailing off like it got bored. On the back hand, out in public all day, clean endings are the whole difference between “home attempt” and “salon finish”.
Should Front and Back Match?
Should front and back match? Someone asks me this at literally every family function. Matching centres look very put-together in wedding photos, I won’t pretend otherwise. But here’s the smarter play I’ve settled on: heavy palm, light back. The back does the public work all evening; the palm stays your surprise for the moment you open your hands. Personally I match just the centre motif on both sides and change everything around it. Same heart, different clothes. Nobody’s confused, nothing clashes, everyone’s happy.
Bridal Tikki Mehndi Designs
“Bridal” and “tikki” in the same sentence makes some people raise an eyebrow. Those people have not attended enough Pakistani weddings. Half the brides I know still build the whole palm around one bold gol tikki, because that round centre is the thing holding a heavy design together. Round it, the artist layers and layers, peacocks, paisleys, fine jaali, and somewhere in there the groom’s initials, hidden, for that ritual where he has to hunt for them while thirty relatives watch and offer zero help.
The Twenty Minute Search
My cousin’s husband searched for twenty minutes. Twenty. His own initial. We gave hints eventually because dinner was getting cold.
The bridal tikki is bigger than the everyday one, but the rings around it do the heavy lifting, petals, dots, tiny flowers, then the pattern spilling towards the wrist. Take the circle away and that same artwork is a beautiful mess. The tikki is the anchor.
If you’re booking an artist, show her a reference like this and point at the centre first. Not the peacocks. The centre. The whole design gets decided from that one circle outward.
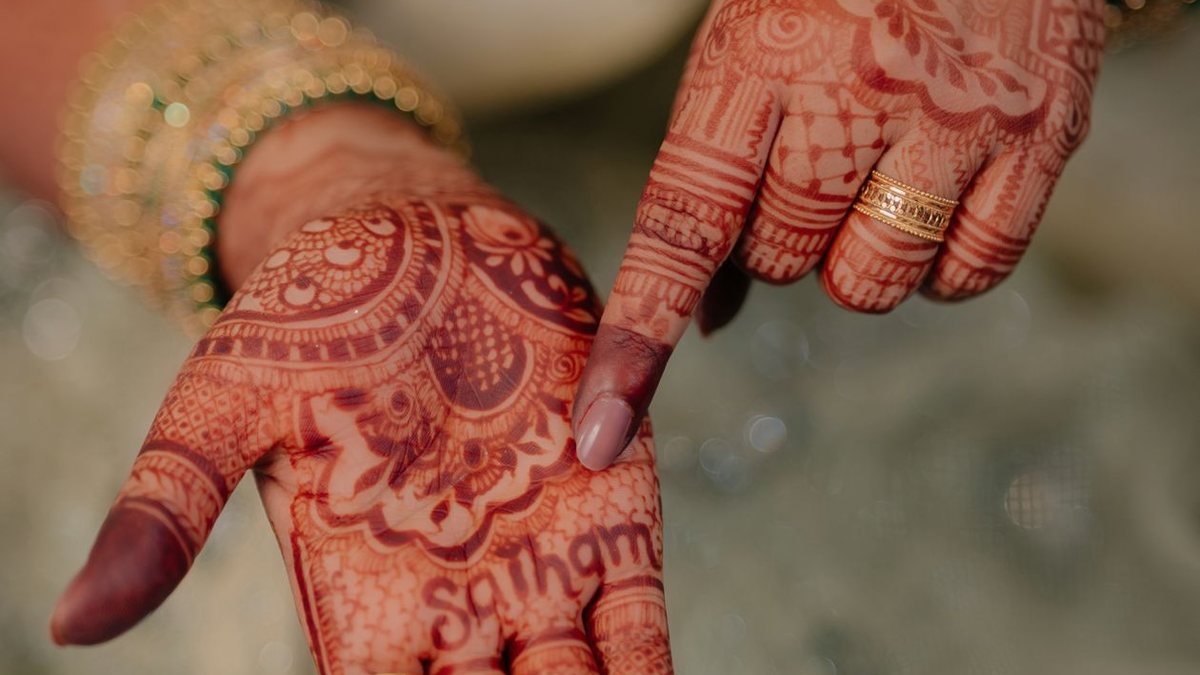
There’s a mountain of mehndi on these hands and your eye still lands on the round centre first. That’s the job. One job. This design does it beautifully.
Advice Every Bride Learns Late
Advice I give every bride now, learned by watching one miserable cousin: get the tikki hand done first, while you’re fresh. By hour three you’ll be hungry, your back aching, and someone, always someone, crying about catering. Feet can wait; your mood cannot.
And sleeves! Heavy full-length sleeves hide arm work all evening, so what’s actually visible? The palm tikki and fingertips. That’s it. Plenty of brides keep the arms simple for exactly this reason, photographs better, costs less, and nobody at a wedding is sad about spending less.
Tikki Designs for Eid and Small Festive Days
Eid morning has its own physics. Cooking to help with. Guests already ringing the bell. Eidi to collect (priorities). Forty photos before lunch. Nobody, I need you to hear me, nobody has time for a design that demanded three careful hours the night before.
This is where the gol tikki earns its keep. One neat circle, stained fingertips, a slim trail only if you can spare five extra minutes. Done. Go eat your sheer khurma while it’s warm.
For Chaand Raat my standing advice is a medium tikki with a petal ring: festive enough for moonlight photos, dry fast enough that you can still help at home without planting it in a degchi. And if you’re wearing a stack of bangles, on Eid, who isn’t, skip wrist work entirely. Learned that the hard way: my chooriyan once covered half a design I’d stayed up till 2 a.m. drawing. The bangles were doing the wrist’s job anyway. They always do.
Last small thing, then I’ll stop lecturing: heavily embroidered Eid outfit means smaller tikki. Busy dress plus busy hand is a fight, and nobody wins that fight. Not you, not the dress, not the photos.
Tikki Mehndi Designs for Feet
Feet get forgotten. Every single time. Then the khussay come out, or the open sandals, and there they are, two completely plain feet under fully decorated hands, looking like they never got the invitation.
A small tikki on top of each foot fixes it in ten minutes. It sits between ankle and toes, smaller than the palm version, usually with one short trail running towards the middle toe. Brides add a thin anklet band just above it and honestly, that little band does half the charm of the whole foot.
Practical warning though: foot skin stains lighter than palm skin. It just does, don’t fight it. Draw lines a touch thicker, leave the paste on longer, and keep it simple, circle, dotted ring, finished. Feet are seen from across a room, in motion; fine fiddly detail is wasted there. Save your eyes for the hands.
Steal the placement, not necessarily the pattern, centre it on the top of the foot, keep it small, let one short trail run towards the toes and then stop. Knowing where to stop is a design skill too.
Look at the toe caps. Colour the tips of your toes to match your fingertip caps and suddenly hands and feet read as one planned set instead of two separate decisions made on two separate days.
Choosing the Right Tikki for Your Hand Shape
Not every tikki suits every hand, and nobody tells you this, so girls copy a design off a photo, hate it on themselves, and blame their hands. It’s not your hands. It’s the match. A bit of honesty here saves real tears later:
Small Hands, Short Palms
Keep the tikki small, skip the outer rings. A big circle on a small palm looks crowded, like too much furniture in a small room. One ring, one dotted trail, best friends, both.
Broad Palms
Lucky you. Big layered bridal-style tikkis on an ordinary Tuesday? You can carry them. Double tikki, extra rings, fill more than feels safe. Empty space is your only enemy.
Long Fingers
Trails were invented for you, I’m convinced. Let the bail run the full middle finger, and finish fingertips with fine lines, not solid caps, caps make long fingers look even longer, like the design is sliding off.
Round, Soft Hands
Cheat slightly. Stretch the circle into a gentle oval, taller than wide. It slims the palm, nobody can tell, and then one finger trail, not five.
One last test, learned at the cost of one entire hand of bad mehndi: sketch it roughly with a pen first and photograph your hand. Mirrors lie. Pictures, where your mehndi will live longest, don’t.
How to Draw a Perfect Round Tikki, Step by Step
Everything stands or falls on that one circle. Wobbly circle, wobbly everything. So let’s get it right, and no, you don’t need a stencil, though a coin or bottle cap will save your pride for the first few tries. It saved mine. Repeatedly.
Keep These Ready Before You Start
A fresh cone with a fine tip, old, leaky cones ruin more circles than shaky hands ever will. A good fresh cone costs around Rs. 100 to 150 at our local bazaar, and it is not the place to save money. A coin, bottle cap, or small lid for your first attempts. A tissue or damp cotton bud for quick rescues. A cushion or a folded dupatta under your arm, so your hand rests instead of floating.
Preparing the Skin
Wash your hands with soap and dry them completely, then wipe the palm once with a dry tissue. Oil, cream, even a little sweat, all of it fights the stain later.
Sit with your elbow supported. A floating hand shakes. A resting hand draws circles. This is not talent, it is furniture.
Decide the size before the cone touches your skin. For most palms, a tikki roughly 4 to 5 cm across, think a bit bigger than a two-rupee coin, looks balanced.
Drawing the Tikki
Press the coin or cap lightly in the centre of your palm and draw around it. Lift it off, then go over the line once more to even it out.
Draw a second, slightly bigger circle around the first, leaving a small gap between the two.
Fill the gap with dots, tiny petals, or small “u” shapes, whichever your hand finds easiest. Even spacing beats fancy shapes, every time.
One bold dot right in the centre. Or a tiny flower, if you are feeling brave.
Now the bail or finger trails, and finish the fingertips with caps or dots.
Still wobbling? Remember nani. Draw four tiny dots first, top, bottom, left, right, exactly where the circle will pass, and join them up. That little cross trick is how she taught me, on the back of my school notebook, the night before Eid. It fixed my circles at age twelve and it has worked at every age since. Once the plain tikki feels easy, you will find more beginner-friendly patterns to practise on in our easy mehndi designs collection.
Study the grip in this photo, cone held almost like a pen, tip close to the skin, other hand keeping the skin gently stretched. That grip is the whole difference between smooth, unbroken circles and the shaky ones that make you want to start over.
After the Drawing Is Done
Leave the paste alone to dry for 20 to 30 minutes. Do not wave your hands about, and do not sit under a fan on full speed, cracked paste lifts early and takes your colour with it.
When the surface looks dry, dab on the lemon-sugar mixture (details in the tips below).
Keep the paste on for 4 to 6 hours, then scrape it off over a dustbin. Never, and I mean never, wash it off.
Common Tikki Mistakes and How to Fix Them
The Circle Sits Off-Centre
The most common mistake in the world, and I say that as a repeat offender. At my cousin’s mehndi a few years ago I produced a tikki so lopsided that my khala, very kindly, called it “artistic”. It was not artistic. It was near my thumb. The cause is always the same: you start drawing before finding where the middle of your palm actually is. Fix it by pressing your palm gently first, the soft centre point is your spot, and marking it with one dot before anything else happens.
Rings That Crowd on One Side
Your hand crept, your cone didn’t adjust. Work in quarters instead: finish one quarter of the ring, turn your hand a little, do the next. Nobody declared your hand must stay frozen in one position for the whole design. Move it. Artists do.
Lines of Uneven Thickness
Either the cone tip is cut too wide or your squeeze keeps changing. Cut the tip smaller than you think you need, you can always cut more, you can never cut less, and spend two minutes practising a steady squeeze on paper first. Two boring minutes that save the whole hand.
A Pale Centre Dot
The saddest little mistake, the centre should be the darkest point and instead it fades into nothing, because the dot gets drawn last and thinnest. Draw it twice: once at the very start, once at the very end. Double paste, double colour.
Smudged Trails
Trails smudge when you curl your fingers too soon, usually to grab your phone. Keep the hand flat until they’re touch-dry. Need the phone? Other hand. Or, radical idea, let it ring.
Tips for a Dark, Long-Lasting Tikki Stain
A tikki sits right in the middle of your palm, which means a weak stain has nowhere to hide. These are the habits that actually make a difference, the ones from my own kitchen-table experiments, not from a packet:
Wash your hands with plain soap and water before you start, and skip every oil and cream. Henna needs clean, dry skin to grip.
Buy a fresh, natural cone. Old stock and chemical-heavy cones are the number one reason for dull colour, and itchy skin, which is worse.
Leave the paste on at least 4 to 6 hours. Overnight if you can, especially for brides. Yes, sleeping with wrapped hands is annoying. Yes, it is worth it.
Once the paste starts drying and cracking, dab it with a cotton ball dipped in lemon juice and sugar water. It stays slightly sticky, keeps working, and the colour goes noticeably deeper.
Scrape the dried paste off. Never wash it off. Then warm a little mustard oil in your palms or use a balm, and let the heat do its quiet work on the colour.
The trick every aunty in my family swears by: after removing the paste, hold your hands over the steam of cloves heated on a tawa for a few minutes. The colour deepens by the next morning like magic. It is not magic. It works anyway.
Keep your hands away from water for the next 12 hours if life allows. The stain keeps darkening for 24 to 48 hours, so do not judge your tikki in the first hour and definitely do not announce to the room that “the colour didn’t come”. It is coming.
Plan housework like a strategist: dishwashing bare-handed in the first two days fades a tikki’s edges before anything else. Gloves aren’t glamorous. Neither is a half-faded circle.
Take your photos on day two. Not day one. Day two is when a palm tikki is at its deepest, richest, most showing-off colour.
This is the colour you are chasing, deep, even, edges still crisp. And no, it does not come from the cone alone. It comes from leaving the paste on long enough and then staying away from the sink like it owes you money.
Frequently Asked Questions
What is a tikki in mehndi?
It is the round, coin-shaped design drawn right in the centre of your palm. A full circle is called a gol tikki, and around that one centre dot, the design gets built up with rings of dots, petals and little flowers. If your nani ever had mehndi on, any mehndi at all, there was a tikki in the middle of it. Guaranteed.
Are tikki mehndi designs good for beginners?
They are honestly the best place to start, and I say that to every girl who messages me saying she “can’t do mehndi”. Circles, dots, short lines, that is the whole design. Small mistakes hide inside the pattern where nobody can find them. Most beginners finish their first gol tikki in under fifteen minutes, feel like artists, and immediately do the other hand worse. It happens to all of us.
How long does a tikki design take to apply?
A simple single tikki with one finger trail? Ten to fifteen minutes a hand, including the cone-fumbling. Fuller front-hand styles run twenty to thirty minutes. A proper bridal tikki, with all its filled layers, can take an hour or more for both hands, but that hour includes tea breaks and gossip, as it should.
Which occasions suit gol tikki designs?
Name an occasion and I will fit a tikki to it. Small tikki for Eid, Friday dinners, even the office. The bigger layered ones are made for mehndis, shaadis and brides. That is exactly why this design never leaves, it grows or shrinks to match whatever the day is asking of you.
Can I do a tikki design on my feet as well?
Please do, especially with khussay or open sandals. Put a smaller version on the top of the foot, run one short trail towards the middle toe, and draw your lines a little thicker than you would on a palm, foot skin stains lighter, so it needs the help. Keep the paste on longer too. Your feet will forgive the wait.
How can I make my tikki design look modern instead of old-fashioned?
Leave. Space. Empty. That is the entire secret. The modern tikki is smaller, cleaner, paired with one finger trail or plain stained fingertips instead of a hand covered edge to edge. Skip the outermost ring, keep your lines thin, and the same design your grandmother wore walks straight into 2026 without changing its name.
Final Thoughts
So that is my case for one small circle. Save the styles you liked, borrow a cone, and try one on a quiet afternoon when nobody needs you for an hour, you will understand very quickly why our grandmothers trusted this design long before photo galleries existed. And if you try one of these, tell me which one you picked. I read every comment, and yes, I will ask how dark the stain came out.